
April 13th, 2008 | categorizilation: all categories,equipment,USA (California)
Today’s distance / ???????: 22 miles / 36km
Average speed / ????: 12.8mph / 20.7km/h
Time on skateboard / ????: 1h 43m
Total skateboarding distance to date / ????????????: 4161mi plus 280mi (?) / 6697km plus 450km (?)
Ascent / ??: n/a
Descent / ??: n/a
End-of-day GPS coordinates: n/a
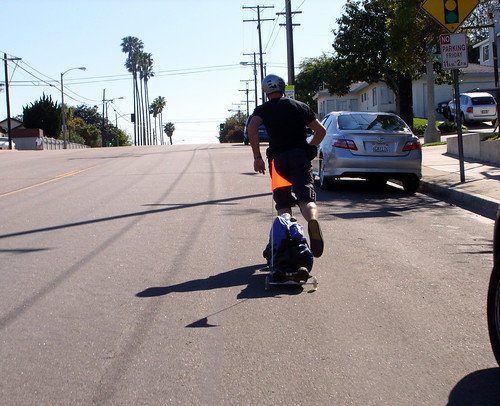
Hold me back. The world of solo long distance skateboarding (albeit a small world at present) is going to change forever. Behold the longboard touring trailer.
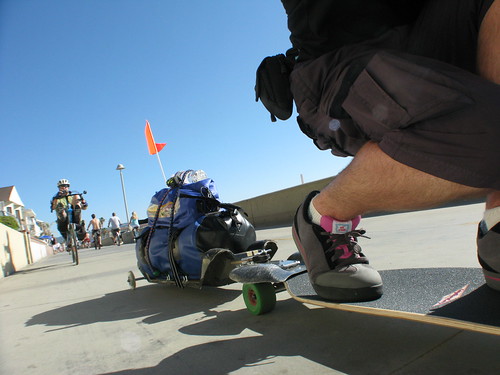
The thing works a charm. Uphill, downhill, on the flat, rough pavement, urban skating, the whole lot. All my concerns regarding hauling a loaded trailer behind my longboard have been thoroughly blown into pieces after a 20 mile skate from Redondo Beach to Los Angeles Airport and back.
My average speed on the short skate was 20.7km/h (12.8mph). For this test ride, I was pulling about 30 pounds (16kg). That’s faster than I’ve ever gone loaded down with gear.آ This is very, very exciting. In fact, when I was on my loaded touring bicycle, I never recorded a full day of cycling where I averaged more than 20km/h. Granted, today’s ride was more than 50% on super smooth boardwalk, but I was dodging pedestrians and slow bicycles, and it was a headwind on the way home.
The only drawback for my setup is that essentially I am pulling a US$570 trailer. The Rollsrolls deck works a treat (low to the ground, lightweight), but to buy one just for the purpose of a trailer would be a little extravagant, I feel.

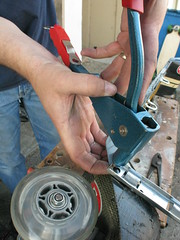
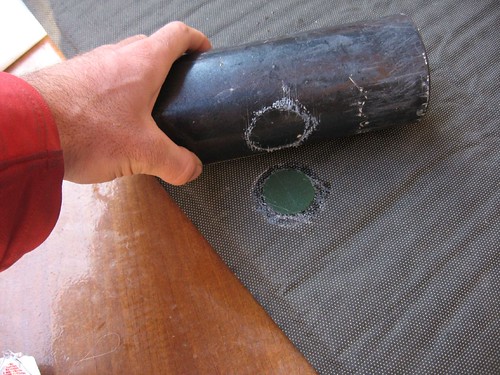
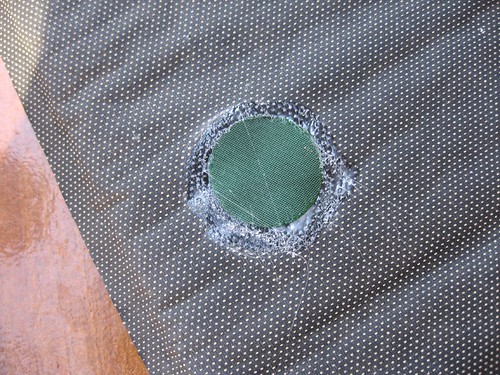
So…if you read yesterday’s blog post, you’ll know that I had some serious issues with load stability on the trailer. The trailer wheels at the back were spaced too close together, making the whole setup too unstable. On corners and with sharp carving on the board, the trailer would fall over. Superstar Kirk drove me all over town this afternoon on a quest to find the perfect super-wide truck to aleviate the problem.
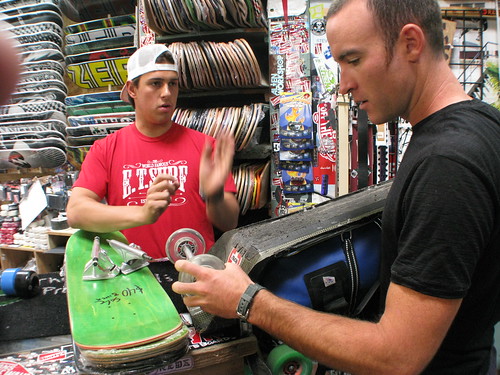
We visited many speciality skateboard shops on the quest. Shop after shop, we got the same answer. The widest available is 215mm wide. That’s only 30mm wider than the one I had. We were not giving up however, and at last, the last local skateboard shop in Redondo Beach, Surf Skate Smoke, we found what we were looking for. From the first step in the door, it was evident that this was the most unlikely place for us to find what we were looking for.
Various drug paraphenalia lined the glass cabinets and shelves. The air smelt of incense. A couple of blurry eyed guys were in the store dusting the livid couloured glass bongs. Or are they called dongs…I don’t know. Anyway, the closest guy, dark shadows under his eyes, asked what we were after. “A really wide skateboard truck,” I answered.
He showed us a couple of Carve Boards that certainly had wide trucks on them, but the mounting pattern didn’t fit wth my longboard. Then I saw what I was after. A simple, cheap kids’ mountain board. The trucks would fit my board. Massive, wide, thumping great big trucks.
The owner of the store was nearby. I asked if he had any spare trucks hanging about.
“Nope, but you can have the board for $100. That’s cost. The price I paid for it. No one is going to buy the thing anyway.” he replied.
“But all I need is one truck,” I said.
“What would I do with a board with only one truck?” was his reply.
Fair enough, I figured. But I wasn’t going to pay $100 for one skateboard truck that online would have only cost $20. But I was in a dilema. Walk away, and I would still have an unstable trailer. Plans for skateboarding across China with a trailer would be ruined.
“OK, I’ll give you $80 for it.” I offered. $80 for a skateboard truck was not even in the realm of reasonable, but I really needed it.
“I usually sell the board for $190, and I’m giving it to you at cost at $100. So $100 it is, take it or leave it.” he replied.
Time to pull out the big guns, I thought. I gave him the low-down. Give me the trucks for a lower price, and get some exposure on my website, I offered. Guinness World Record, blah blah.
“You see what this shop is? You understand what we sell here, right? Are you sure you want to link to our website?” he warned.
To be honest, I wasn’t keen at all for any association with his website or store. But I really needed the trucks. “Yeah, no problem,” I lied. I wasn’t feeling good about it, but we had exhausted all of our other options for finding what we needed to make the trailer work.
In the end, he gave me both trucks on the board for $60. Thank you to Surf Skate Smoke for your wonderful assistance in making my dream a reality.
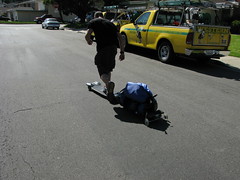
We got back to Kirk’s place and fitted the superwide trucks. They worked a treat. Even with hard sharp carving, the loaded touring trailer stays upright.
(Thanks to Kirk Crawford for the pic)
April 12th, 2008 | categorizilation: all categories,equipment,USA (California)
Nothing quite like leaving everything to the very last minute. We are experiencing some major issues with the trailer at present, and I’m leaving tomorrow night. Ouch. This is going to be a cliff hanger.
Kirk and I made an early start on getting the longboard trailer into shape. We spent most of the morning driving around aquiring the various required parts. U-bolts, nylon webbing, nuts, bolts, washers…once all was together, the construction began.
I couldn’t help but think that the likes of Peter Sanftenburg (Rollsrolls owner and creator) and Dave Cornthwaite (UK Rollsrolls distributor) would be having kittens if they saw us ripping into a Rollsrolls deck, making it into, of all things, a trailer:


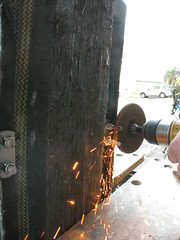
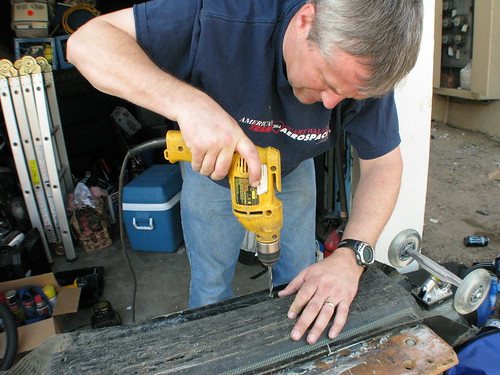
The reality is, the Rollsrolls deck makes a fantastic trailer. It’s nice and stiff, really lightweight, and being so narrow, it doesn’t get in the way of my foot as I push the front board.
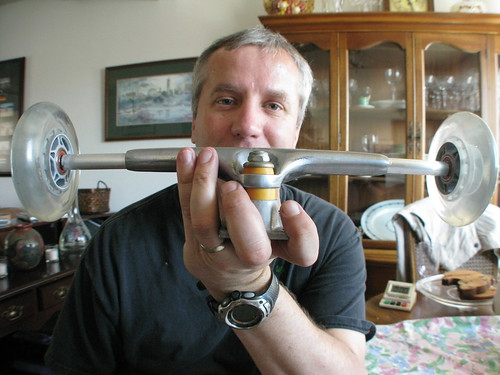
Once we got the whole thing together, I strapped on all my gear. The first impression was not good. As soon as I turned, the trailer flopped over on its side. Even at relatively slow speeds, the trailer was very unstable. The culprit? The rear truck is too narrow. Not wide enough. It’s narrower than the load itself, so naturally even the slightest amount of sideways force is enough to push the trailer off balance. A moderate side wind would even be enough.
Kirk and I decide that what we need is a really wide truck at the back. Like a mountain board truck. If we had a week worth of time to order one of the internet, we’d be fine. Problem is, it is Sunday tomorrow. And I leave in the evening. How to find a shop that sells mountain boards, that has spare parts? It is not going to be easy.
April 8th, 2008 | categorizilation: all categories,equipment,USA (California)
Mmmmmmmm. Fruit. Went to the farmer’s market with Donna today. Mmmmm. Fruit.


But in more important matters…I’ll be blowed if I’m going to haul 20kg of gear and food and water across China on my back. So I’m going to use a trailer. Let me tell you how this is all going to work…
About four weeks ago, I had the wonderful fortune to meet Karen and John Poole, a wonderful long distance cycling couple. That was on day 581 waaaaaaay back in Texas (shudder). John and Karen’s son, Cory, is a longboarder from way back, and is very active in the long distance skating scene in Oregon, a state here in the US. Cory called me out of the blue one day in the middle of the desert in Texas, and I enjoyed chatting with him. I mentioned that I was considering opening up an invitation to board builders in the US to make a board for my skate across China.
To cut a long story short, Cory mentioned this to Longboard Larry from up in Oregon, and a month later, he is putting the final touches on a new board for me as you read. Also in the works is a coupling device that will attach a trailer to the new board.
The trailer at this stage will be very simple. I will be using my old Rollsrolls deck (the one I have been skating on for the last 7,000km). Haven’t quite worked out yet how I will attach my gear to the trailer. Perhaps attach some u-bolt-like steel hoops to the deck and then use bungee cords…
In any case, this is all very experimental. Cory mentioned someone he knew who used a trailer behind his longboard skateboard, but apart from that I have not heard of anyone else even contemplating this. It is hard to know whether this will improve efficiency or hinder it, but I am fairly sure that with less weight on my back, my body will not have to work as hard.
So, within the next few days I hope to receive the board and coupling in the post, and have a chance to give the whole setup a few practice runs along the beach cycle paths here in LA before setting off to China.
Jolly exciting.
Oh and the Chinese visa. I have no answers. Gonna have to play that one by ear.
December 8th, 2006 | categorizilation: all categories,equipment
Did you know that there is a revolution happening right on your doorstep? It is here, and you need to be a part of it.
Youآ آ آ mustآ آ آ conformآ آ آ toآ آ آ theآ آ آ آ cardboardآ آ آ people

When Homeless Take Over The World
From the site:
Soon, in a time not far from now, things will change and the people of East Hastings will take the world back from their evil wealthy oppressors. It’s only a matter of time until aآ batch of dodgy meth genetically mutates the users into Super Humans.آ There will be blood shed and the once joyously usedآ needles wasted, the spread of ‘theآ aids’ will be unstoppable. The only survivors of this horribleآ plague will be… the cardboard people. After years of suffering they will be immune to ‘the aids’, they will be the new rulers and cardboard will be our gold.
آ
Prepare yourselves!!!!!!!
آ
Live derelict, buy cardboard……….
November 24th, 2006 | categorizilation: all categories,equipment,Uzbekistan
While in Tajikistan, I slept out in the open one night. Problem was that it was dark when I put my sleeping mat down. In the morning I pulled out two big thorns from the mat, leaving some nice punctures.
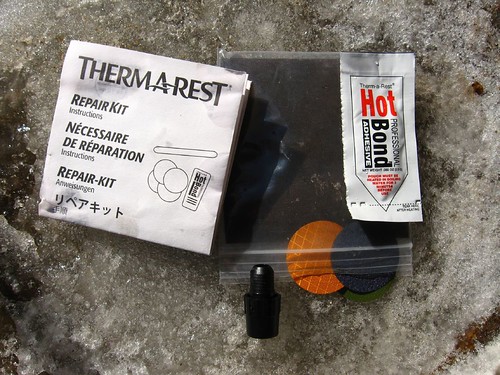
I did however have a thermarest repair kit with me, and today I got around to fixing the punctures. Here’s how:
How to Repair a Punctured Thermarest
Step one
Get the kit ready.
Step Two
Mark the puncture with a circle slightly larger than the patch. You may need to put the fully inflated mat into a sink full of water in order to find the leak (look for bubbles).
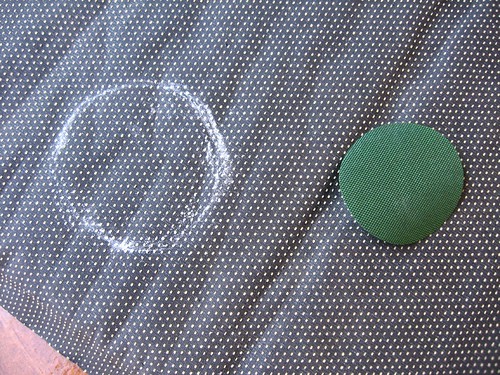
Step Three
Chuck the hot bond in boiling water for three minutes.
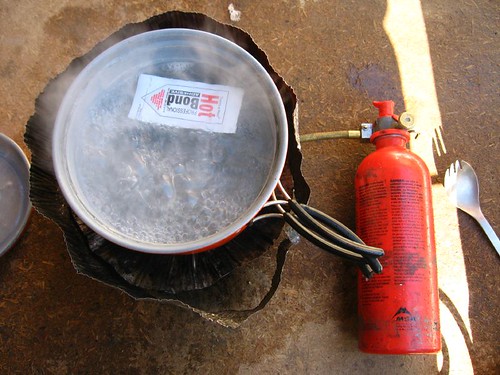
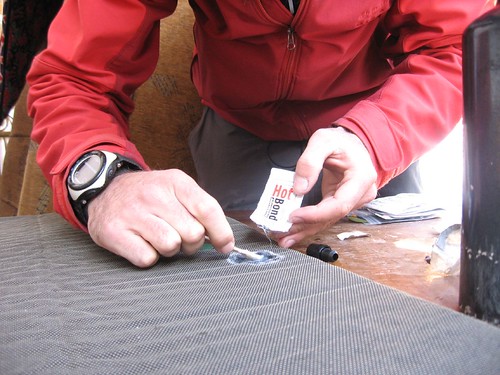
Step Four
Remove the hot bod from the water, rip it open, and apply it to the thermarest, kneading it into the fabric with the applicator. Then put the patch onto the glue. You have about 45 seconds when it is cold in order to get the glue applied and the patch on.
Step Five
Put a plastic bag over the patch and glue, and then place the pot of boiled water on top for 60 seconds. According to the instructions, the hot pot will not damage your thermarest if the valve is open.
Step Six
Remove the pot and immediately roll over the patch a few times with a cyclindrical object such as a metal water bottle (you can easily peel the hardened glue off the bottle afterwards).
Step Seven
Leave the thermarest undisturbed for 10 minutes. The mat is now ready for use.
November 23rd, 2006 | categorizilation: all categories,equipment,recumbent bike,Uzbekistan
I replaced the seals and regreased the insides of my rear suspension (DT Swiss SSD 225 air shock) yesterday. Fantastic shock by the way. Not a hint of dirt or wear inside. This is the first time I have serviced the thing in 7000km.
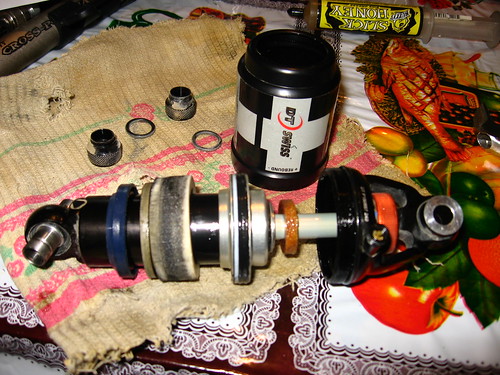
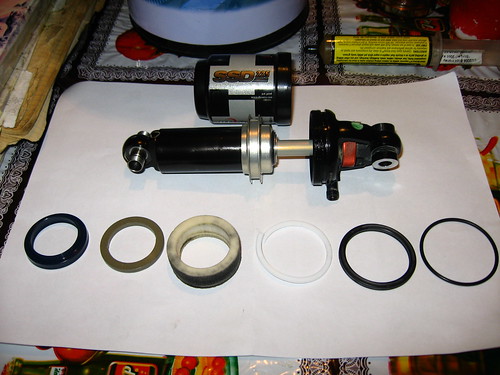
The Lizzard Skin suspension boots have played a large role in this I think. They keep all the dust, water, and dirt off the shocks, so wear on the seals is decreased.
It is very easy to take this shock apart. Put the end in a spanner, and then just screw the housing off with your hand (make sure the air is totally removed before taking it apart!)
July 21st, 2006 | categorizilation: all categories,equipment,planning/prep,war on weight
| Today’s savings: | 292g |
| Total savings to date: | 1038g |
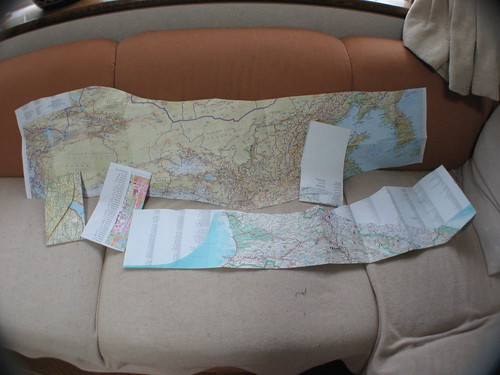
Today the maps were in my sights. I removed all areas of the maps that I do not plan on going to, and in that way saved 292 grams. This brings my total amount saved to date to over 1 kilogram. Considering that wieght is the same as one litre of water, that’s a very important saving.
July 20th, 2006 | categorizilation: all categories,equipment,planning/prep
Some updates to this website today:
Cheers.
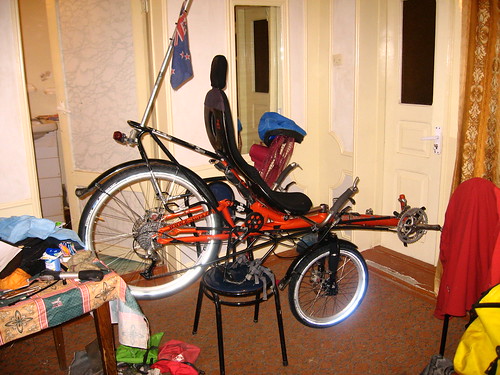
July 19th, 2006 | categorizilation: all categories,equipment,planning/prep,recumbent bike
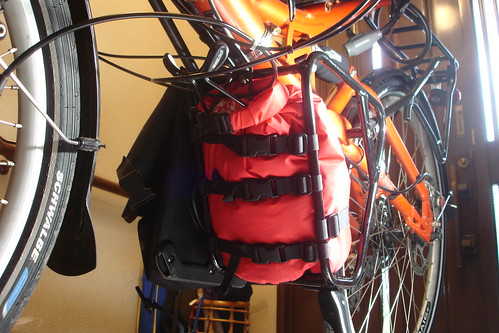
Under the seat of the 14degrees bike, there is a rack to attach some small sized pannier bags. There was a space here to stow a small drybag filled with tools and spare parts, so I have attached some nylon straps and clips to hold the drybag in place.

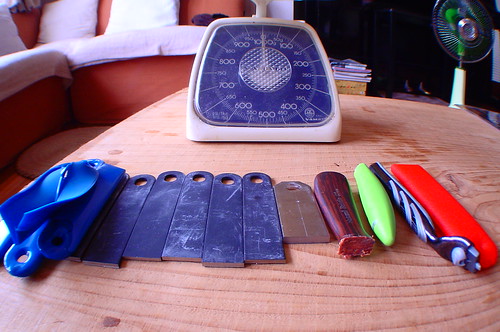
July 13th, 2006 | categorizilation: all categories,equipment,planning/prep,war on weight
| Today’s savings: | 689g |
| Total savings to date: | 746g |
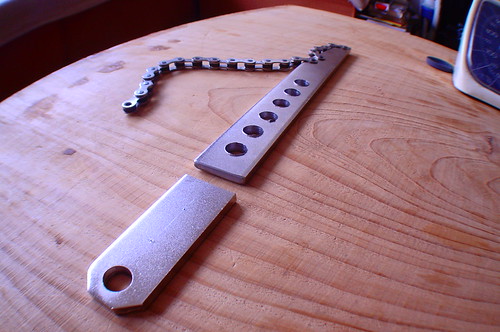
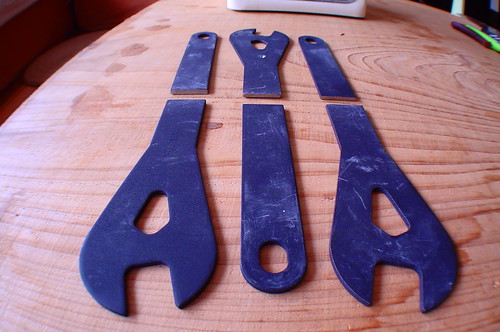
Right. No holds barred today.آ All handles in my sight were removed.آ Shaver handle, toothbrush handle, cone spanner handles, chain whip handle…
 آ
آ
 آ
آ
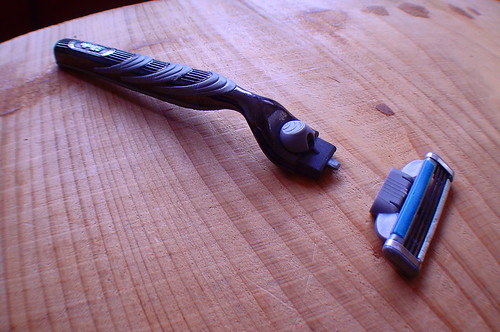
As for the shaver handle, if you’re using the Gillette Mach III, then the little stub is just big enough to hold between the thumb and forefinger for an exciting shave. I say exciting because for the first few shaves, there is a tendency to push to hard. Expect a few chainsaw massacre episodes…
I also put my fourth form sewing class skills to the test and made a roll-up tool case for all the ‘hope I don’t need to use these too often’ tools.

I call it ‘The Brick’. 2.2kg of metal. Argh.
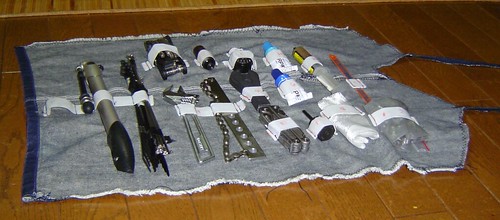
From left to right, top to bottom: Suspension/Tyre pump (spare), spokes and cable ties, bike multi-tool, spanner, crank remover, chain whip, bottom bracket socket, cone spanners, plier multi-tool, expoxy resin (for seat repair), freewheel socket, grease, fibreglass cloth, hacksaw blade, length of chain and various bolts.
