First Impressions Review of WheelShields – Mudguards for a Longboard

First impressions summary PROS: WheelShields – mudguards (fenders) for a longboard – are a game-changer. Commuting by skateboard on wet roads doesn’t mean road grime on your pants, shoes, and deck anymore. If you’d rather skate, even after a downpour, and arrive at your destination clean and dry, these do the trick. CONS: Can be tricky to install (but the video does help: http://wheelshields.com/pages/install), may not fit all trucks, and are a little on the heavy side.

Wheelshields - fenders/mudguards for your longboard

Disclosure: I’m not affiliated with or compensated by WheelShields. I pre-ordered and paid in full for a set of WheelShields when they were still in the crowd-sourcing stage on Kickstarter.

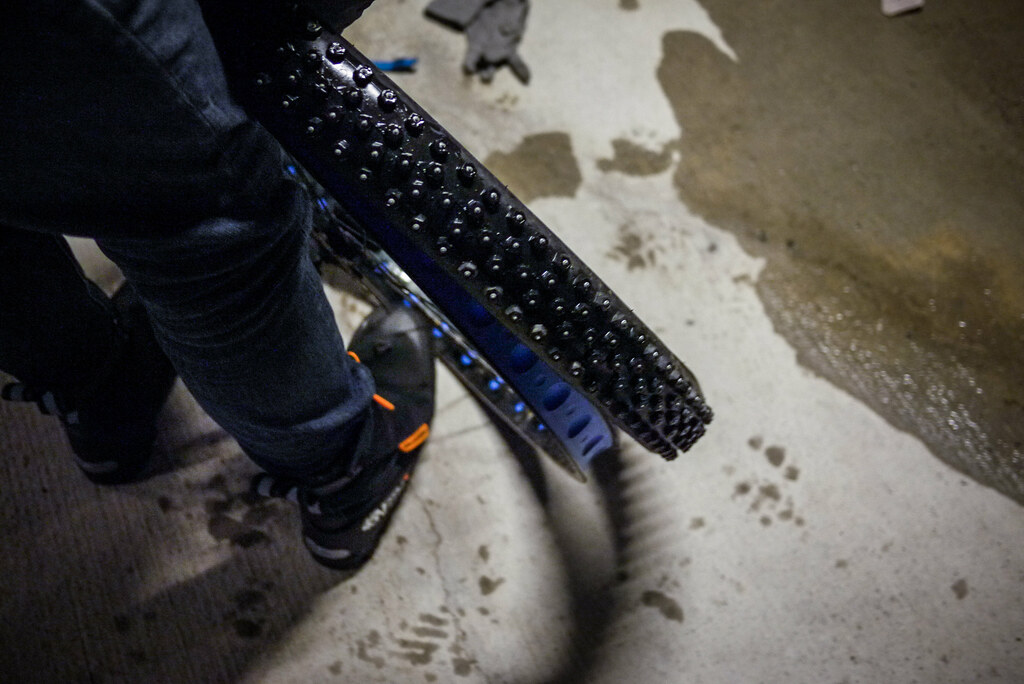
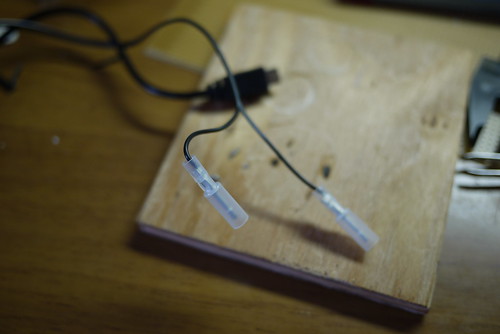
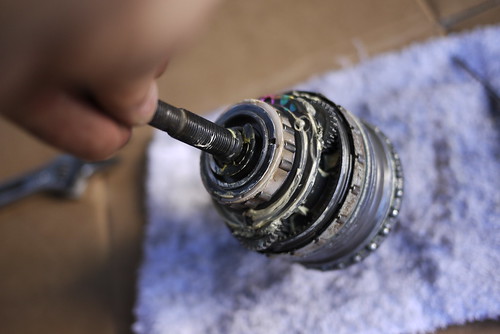
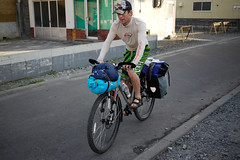
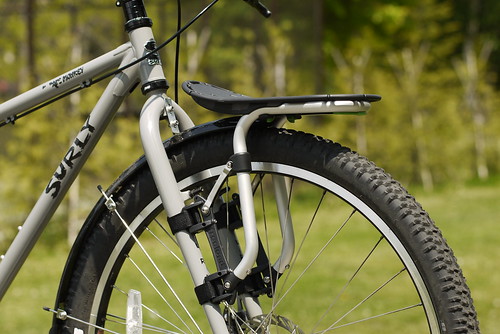
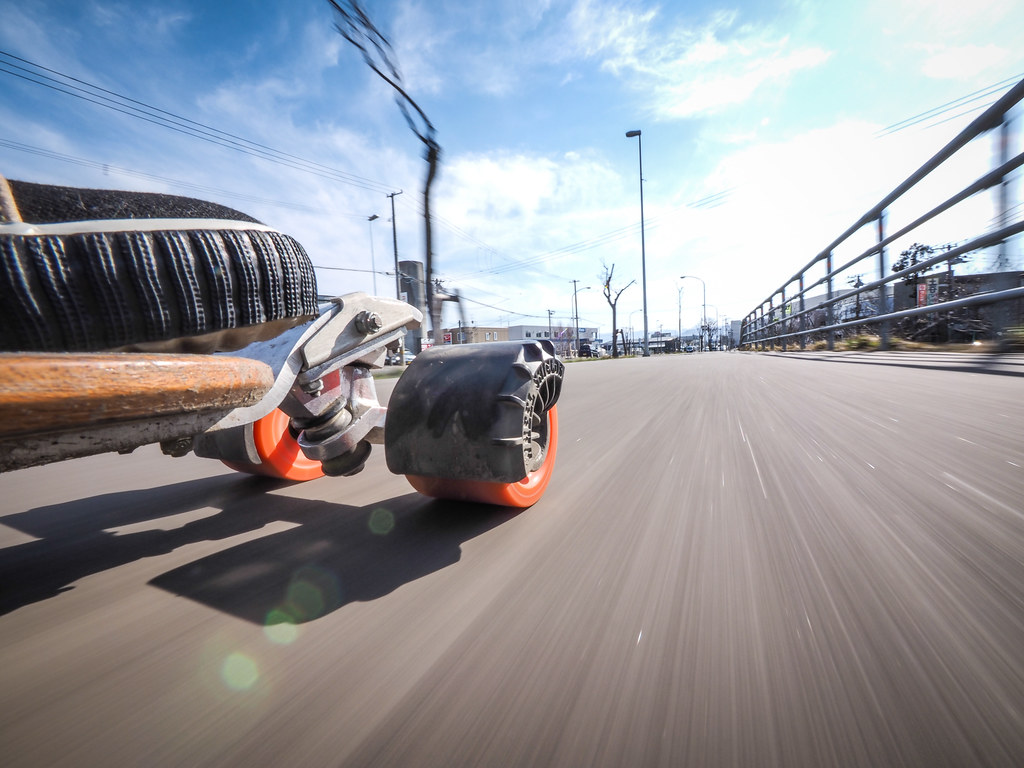
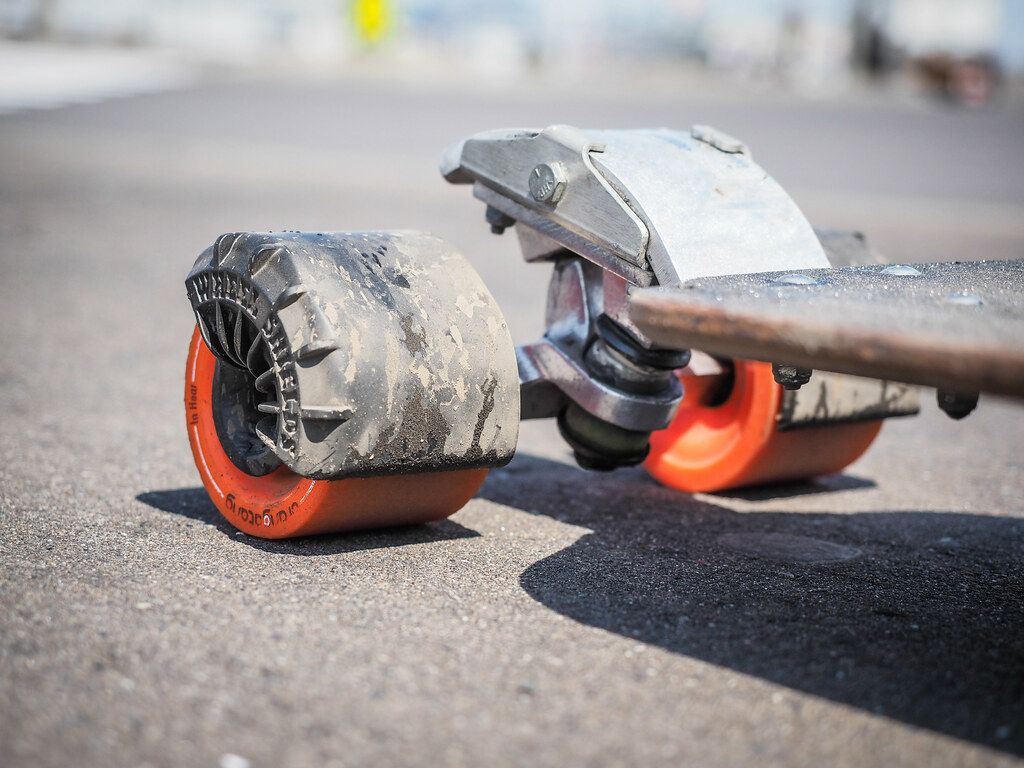
My setup: Gbomb Paramount Board, Bennet Vector Model 5.0 trucks (front), Holey Trucks (back), Orangatang In-Heat 75mm 80A wheels (front), Orangatang Durian 75mm 83A wheels (back), Seismic Tekton bearings (no separate spacers), WheelShields (black).

Almost a year ago, I wrote “Wheel Shields are brilliant. Hands down the biggest innovation in longboarding in a long time. I wish I had Wheel Shields when I skated across the US, Europe and China. Wheel Shields have changed the longboard transportation paradigm forever. They are an elegant solution to a frustrating problem.”

The frustrating problem I was referring to was getting my longboard deck swamped with water (= slippery), and getting soaked shoes and pants due to water flicking up off wheels as they ran over a wet surface. Even just a couple of shallow puddles on an otherwise dry road or pavement could mess up a clean pair of pants.

Already I can hear some people groaning. “What a pussy! Boohoo dirty pants…get over it!” This first impressions review of Wheel Shields is not for such people. This first impressions review is for people who want to skate to work or school everyday (even if it had been raining in the night), and who would actually rather stay dry no matter what the pavement condition.

For such people: WheelShields work.

Where I live, we get a lot of snow during winter. Around this time of year in spring, we get clear sunny days, but lots of snowmelt running across cycleways and roads. It is at times like this that the WheelShields really come into their own for me. Dry road, wet road. Clean and dry shoes and pants, no matter what.

Wheelshields - fenders/mudguards for your longboard

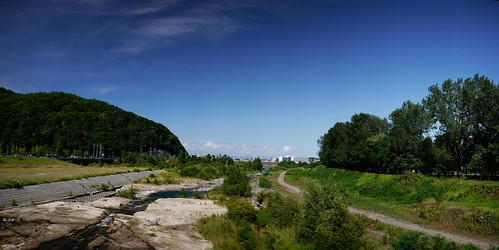
For my inaugural test-skate, I skated around 15km (9 miles) along a river-side cycle path and city streets. To be honest, for the first half of the ride I was nervous. I mean, if for any reason those WheelShields turned with the wheel, they would stop my board in a split-second. Faster than a nice sharp concrete lip in the sidewalk. So far, however, they are holding fast.

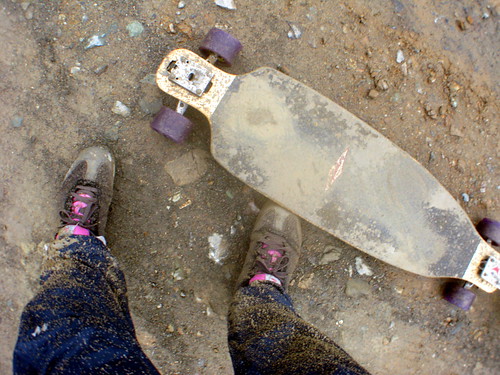
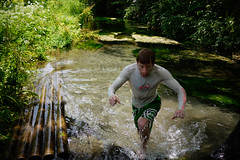
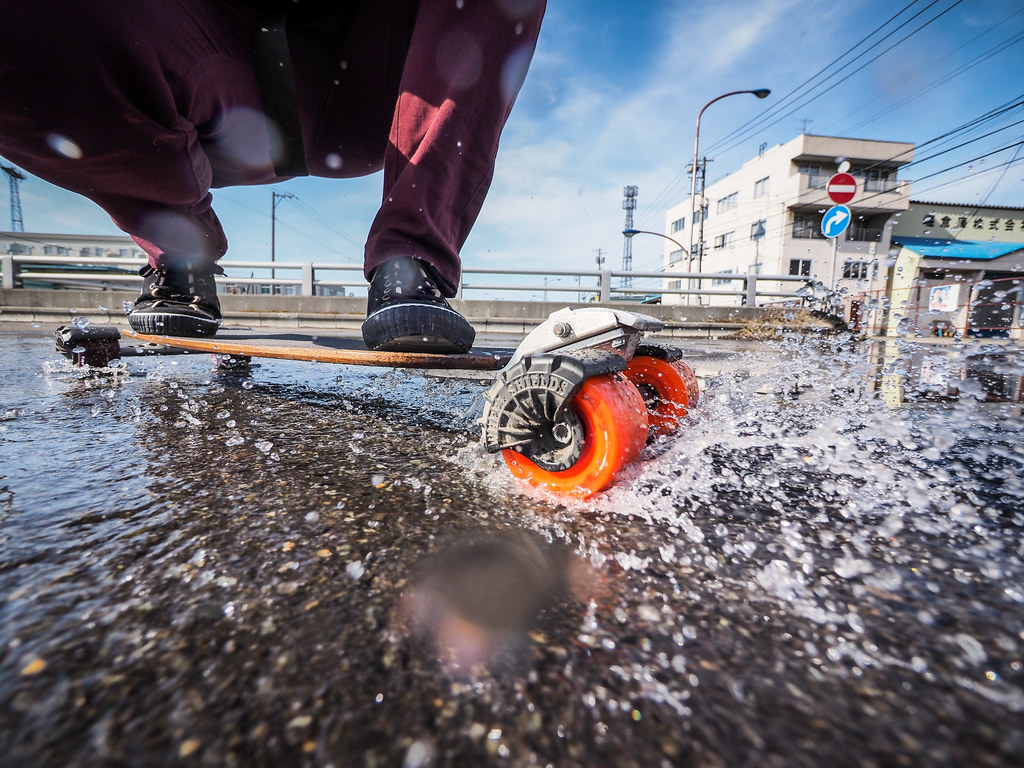
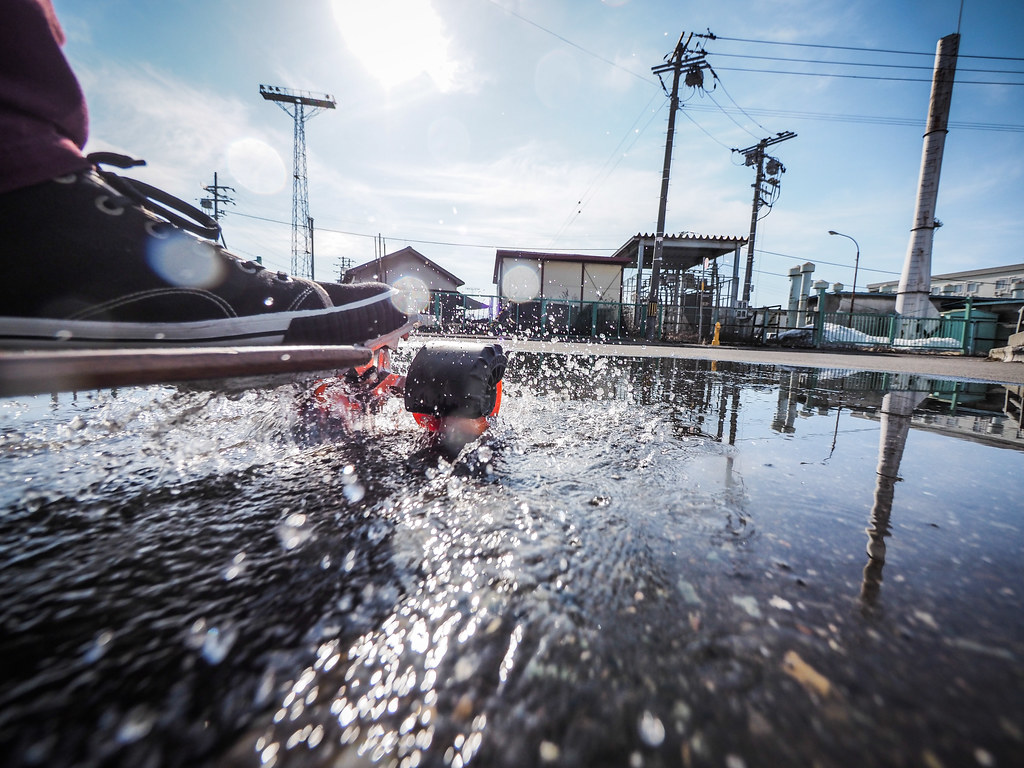
For the most part, though, I was amazed at how they prevent almost all water from being flicked up onto my board. Even the 4-foot long patch of muddy snow-melt below would have covered my white shoes in dirty spots in a moment, had I not had the shields.

Wheelshields - fenders/mudguards for your longboard

That said, they are not spell-casters with invisible forcefields. If you hit at speed a puddle of water anything more than 1cm (half and inch) deep with water, the forward-and-upwards splash of water being displaced in front of you will splash up onto you. That’d be very hard to avoid, even if WheelShields came in some sort of uber-full-coverage design.

Wheelshields - fenders/mudguards for your longboard

After all this gushing over how awesomely functional they are, time for some hard truths: In terms of design, they’re not perfect, yet.

In their current form, WheelShields are not only designed for stopping water flicking up off wheels. They are also designed to carry something like 680kg (1500lbs) of weight on them, before they collapse. So you can stand on them (I tried, and they’re solid as a rock). You might want to invent new tricks. They’ll stop wheel-bite (if that is an ongoing, recurring issue for you, in which case you don’t need WheelShields, just some common sense to adjust your risers or get smaller wheels).

This is to say, they’re tough, but they’re a little on the heavy side. They’ll add about 400g (14 ounces) of heft to your board. I’m willing to pay that price in weight because I want to use my board in a wider range of weather conditions, but I’d like to see a lighter-weight fender-only version in the future.

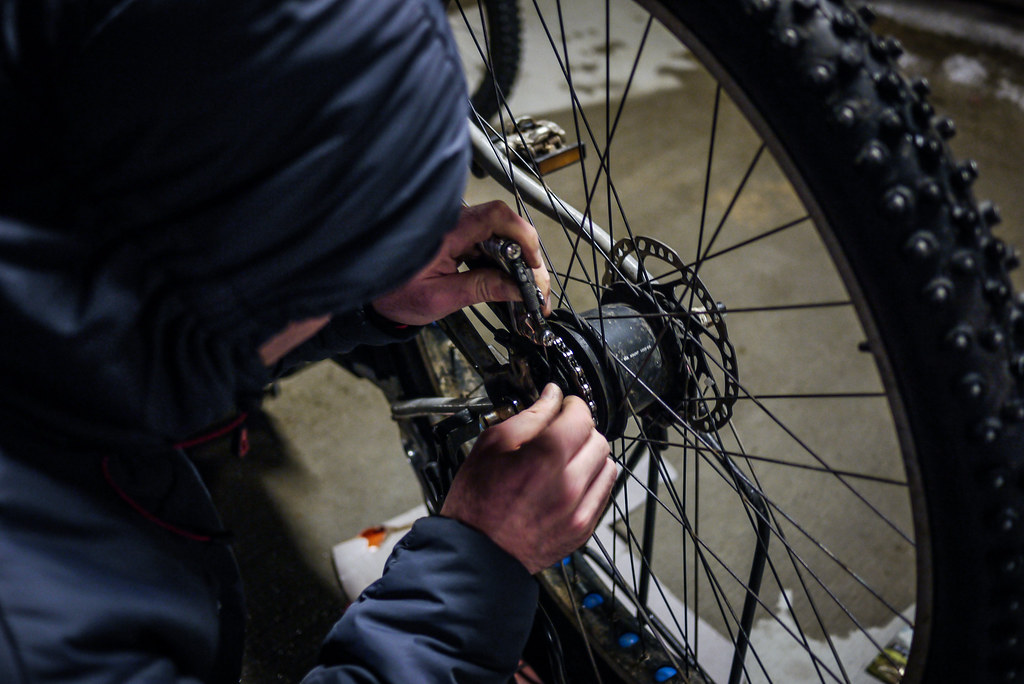
Another little niggle is they didn’t fit my Tracker RTS 129 trucks. The axle length from end of hanger body to end of thread on the axle was about 2mm too short, meaning that the outer nut supplied with the WheelShields couldn’t get enough grip. They fit my Holey Trucks (plenty of room on the axle) and Bennett Trucks Vector Model 5.0 trucks (only just) with no problems though. Perhaps the Trackers just have a particularly short axle?

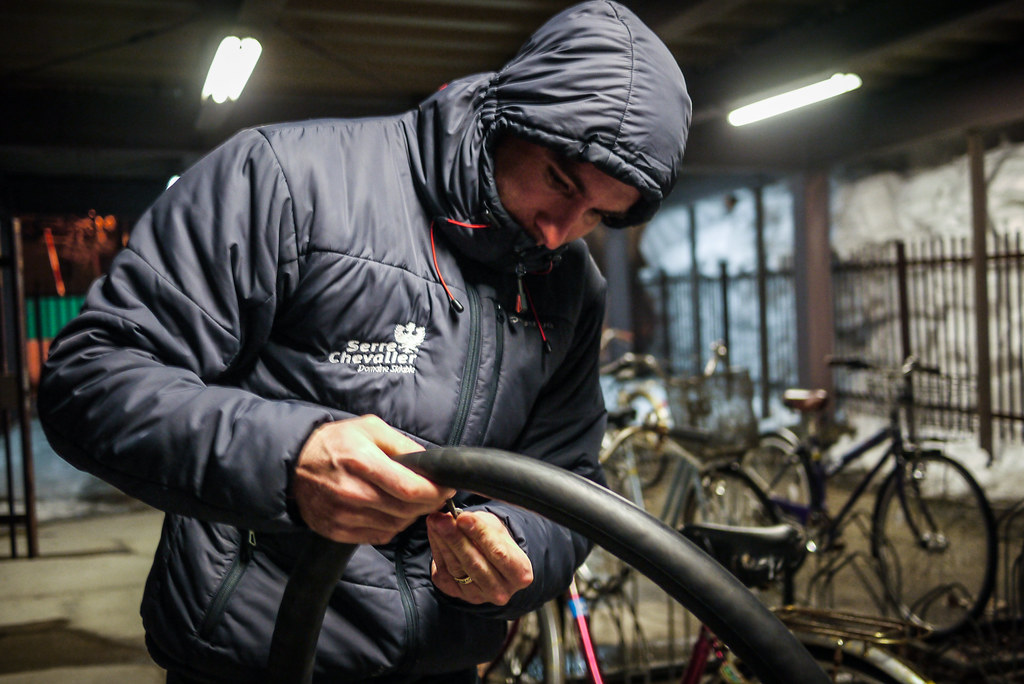
Also, first-time installation can be time-consuming. Mainly this has to do with getting the WheelShields on the right angle, and at the same angle on each side, at least for me. I have mine installed on an angle, which WheelShields expressly forbids. They insist they are installed so the top flat-ish area of the shields is parallel with the ground. I assume this is to ensure the greatest strength when standing on the shields. For me, however, all I care about is making sure the shields catch splashes. So they’re angled back at the front.

Wheelshields - fenders/mudguards for your longboard

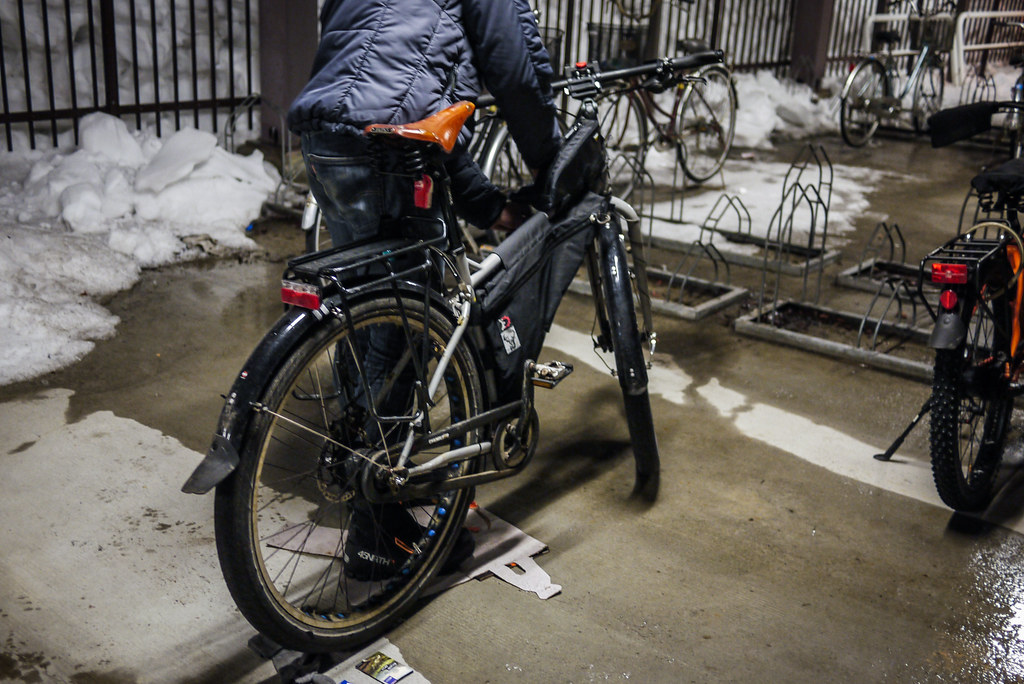
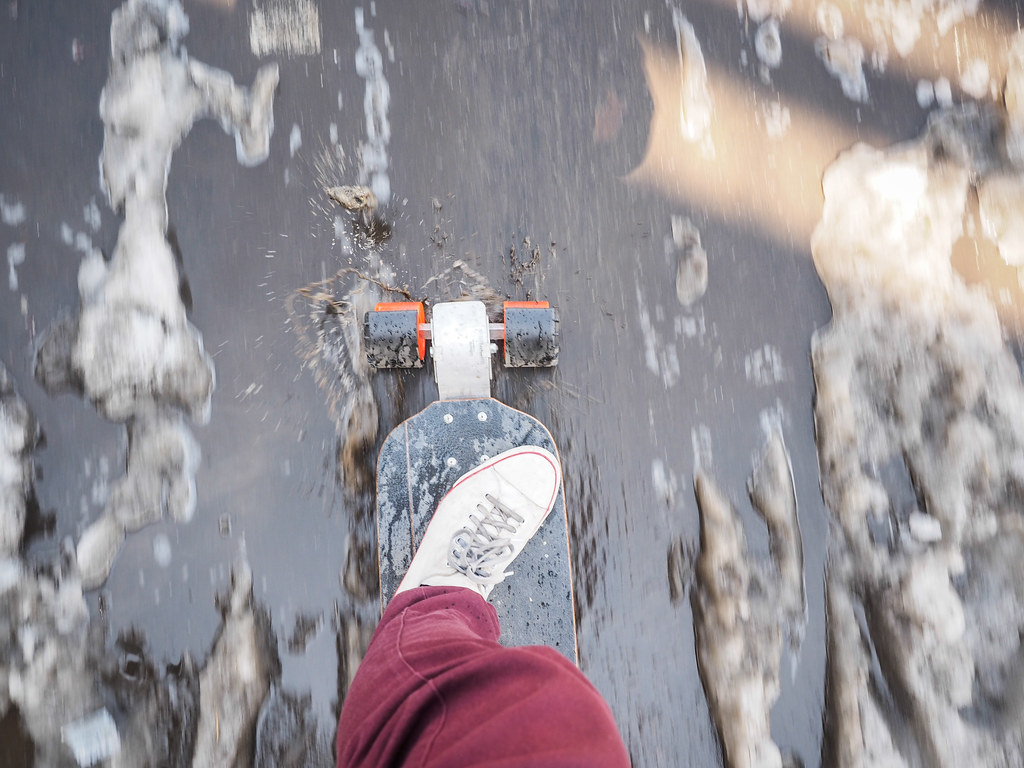
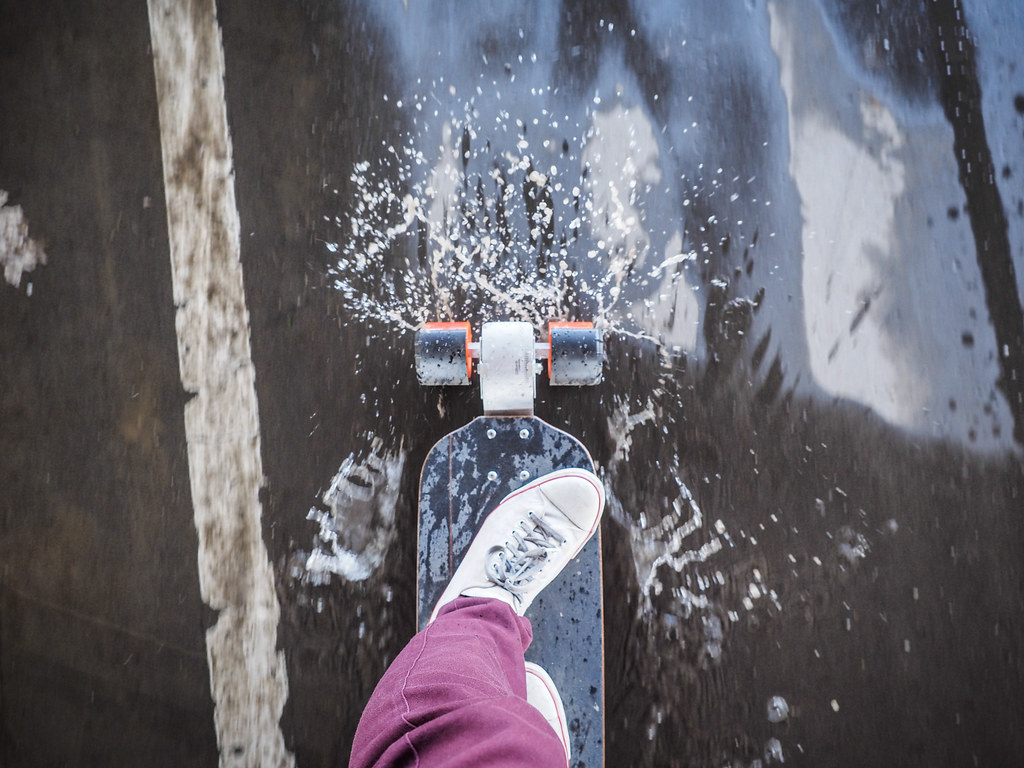
Those minor drawbacks aside, I love them. The picture below shows the bottom of my board after that 15km skate around the city. If I didn’t have the WheelShields, the top of the board would have been just as dirty.

Wheelshields - fenders/mudguards for your longboard

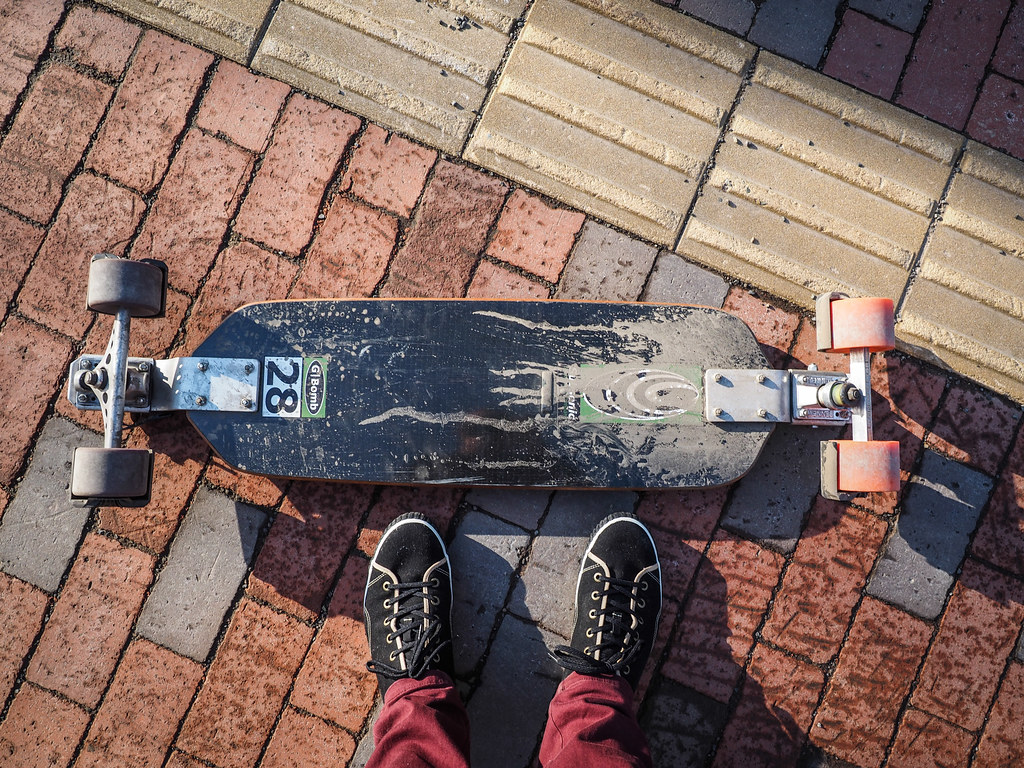
As for why the underside still gets so dirty, I think it may have something to do with water being pushed to the side and upwards away from the wheels, causing a wave of water being driven up onto the bottom of the board.

If you take a careful look at the photo below, you can see that very little water gets flicked up off the middle part of the closest wheel. My shoes stayed totally dry during this (repeated) splashing through this puddle (for science’s sake, of course). However, water does get displaced towards the center of the board, which then meets water being displaced by the opposite wheel, pushing everything up onto the underside of the board. At least it stays under the board though…

WheelShields - fenders for a longboard

All in all a fantastic product, which I thoroughly recommend. US$49 (plus US$20 for international shipping) might seem a little on the expensive side just for some ‘mudguards’, but think of that money you’ve spent on driving the car or taking public transport just because you can’t skate because it’s raining lightly or the roads are wet – no longer an expense you’ll have to front up.

Just bring on the lightweight fender-use-only versions,  and then they’d actually be perfect.

2014 Spring Tire Change

For four months of the year here in Sapporo, we cycle with spiked tires. That’s mid-December till mid-March. At the beginning of winter, in December, the decision to make the change from normal tires to spikes is fraught with uncertainty: It is snowing today, but will there still be snow on the ground in a couple of days? Inevitably, I do end up cycling a week or so on bare asphalt before the roads finally become firmly in the grip of snow.

In March, the opposite uncertainty is true: The roads are clear today, but will there be a big snowfall in a couple of days? That said, I’m pretty sure today was the right day to make the switch. I’ve grown tired of noisy metal spikes on pavement (and the bewildered looks from pedestrians as I noisily approach).

Haidee was there to document the 45-minute procedure in a relatively balmy 3 degrees Celsius.

First, off with the spikes on the front tire. I use the excellent Schwalbe Ice Spiker Pro tires. This is my third full season on the tires. I think they’ll last another couple of winters. With more than 400 aluminium-embedded carbide studs in each tire, they are some the most expensive mountain-bike-sized studded tires you can buy. But even then they cost less than a full tank of gas in most automobiles.

I opted to switch out the tubes for some lighter-weight ones. This is not so much for the literal weight savings, but the thinner tubes make the tires as a whole more pliable, making for a more comfortable ride (tubeless would be ideal, and I intend to make the change at some point).

The after-switch tires are the fat and plush Schwalbe Big Apple tires. These tires have a very pliable sidewall. That plus very high volume of air makes them a very comfortable and fast ride. This will be my third season on this set of tires. Wear looks to be acceptable on both tires.

I have a Shimano Alfine 8-speed internal gear hub (IGH) on my back wheel. This means removing the back wheel involves a few more steps than a standard quick release setup. I also have a full chain cover (Hebie Chainglider). I haven’t removed the chain cover all winter, and the chain looks in relatively good shape (I give it regular squirts of very light lubricant).

The completed job…

Could do with a more thorough clean of the bike, but that’ll have to wait till a warm weekend.

After a third of a year on the knobbly crunchy spiked tires, the slicks feel like I’m on a magic carpet: Quiet, smooth, steering more direct. Lovely.

Jobs still to do:

  • Change handlebars to ‘butterfly’ trekking bars
  • Take the bike to bits and re-apply anti-rust to the inside of the frame
  • Change the brake pads (Aztec Organic are my pick for quiet braking)
  • Get the dynamo-powered back light wired up


Wheel Shields – get in and support a great idea

Get in and support an awesome product for keeping people who longboard for transport clean and dry – Wheel Shields: http://www.kickstarter.com/projects/1522548247/wheel-shields-longboarding-technology

Way back in 2008, I was in western China sitting in a stifling internet cafe. I had already skated over 6,000 miles (9,600km) across the US and Europe, but in the previous days, I had spent a couple of days skating on wet roads, getting legs covered in road grime, yak shit, and slug guts. Some of the roads were also hard-packed dirt, which were still skateable when they were wet, but caused havoc on my shoes and clothes. This was a super frustrating issue. Sure, dirty pants and dripping wet shoes can be cool. But not when you want to sit down at a restaurant, cafe, internet cafe, someone’s chair in their house, etc.

On my way down unpaved Qinghai Highway 204 4,190m pass towards Reshui, Qinghai Province, China

Wet roads near Chiling, Qinghai Province, China Loving the minor road 304 from Erbou to Chiling, Qinghai Province, China

Sitting in that internet cafe, I thought up an idea for a fender/mudguard setup for a longboard. Below is the sketch I did in 2008, to explain the idea to my product-designer brother. “Can it be done?” I asked. He was confident that it could be done, but it would require a lot of work prototyping before a decent device could be created. The idea promptly got put in the too-hard-basket.

Idea for longboard fenders (circa. August 2008)

Fast forward to 2012. I get an email out of the blue from Chase Kaczmarek from the US, asking for my opinion about his invention called Wheel Shields. He was developing them into a marketable product. I said that they are brilliant. A year later, he’s got a very elegant, refined product ready to produce. The one thing he’s not got is money to create the tooling to mass produce them. That’s where his Kickstarter Campaign comes in: http://www.kickstarter.com/projects/1522548247/wheel-shields-longboarding-technology.

He needs US$25,000. He’s raised just over US$14,000 so far, with 11 days left in his fund-raising campaign. I’ve already pledged my support by ordering a set. I really want to get my set of Wheel Shields. It will mean that skating to school and work will be a reliable option, without having to worry about rain during the day creating wet roads. So do get in there and support a great idea and the masses of work that has gone into making them work: http://www.kickstarter.com/projects/1522548247/wheel-shields-longboarding-technology.

To be honest, I think for purely distance skaters, who are not concerned with wheelbite or ‘shoe-bite’ or stand-on-wheels-tricks, they are a little bit on the over-engineered side. For just ‘fender’ or mudguard applications, light plastic would be fine. But still, I do stand by my words: Wheel Shields are brilliant. Hands down the biggest innovation in longboarding in a long time. I wish I had Wheel Shields when I skated across the US, Europe and China. Wheel Shields have changed the longboard transportation paradigm forever. They are an elegant solution to a frustrating problem.

* The quote above was edited slightly on Chase’s Kickstarter page to keep things brief.
** I should also mention that I am in no way officially associated with Wheel Shields, or receiving compensation from them…

自転車のダイナモハブに使う自作(DIY)のUSB充電器

本投稿では、ハブダイナモ搭載の自転車に使える、スマートホン用のUSB充電器の作り方を紹介します。アイディア自体はMr. Howdy,  Arenddeboer.comPeterから来ていますが、彼らのインストラクションでは、回路図がある程度読めないとワケがつかみにくいです。私自身は回路図が読めないので、同じように回路が読めない人間のためにできるだけ簡単にここで説明します。

DIY Dynamo USB Charger for a Bicycle | 自作の自転車用のダイナモ充電器(USB)

私が作ったダイナモハブ用スマートホン充電器(軽さ:29g)

今回作る充電器の概要

総費用:1,500円程度(部品のみで、半田ごてなどの必要な工具は含まない)
重さ:29g
耐候性:有り
出力:5V 1A DC (USB標準)
入力:6V AC (ほとんどの自転車ハブダイナモはこれにあたる)
充電効率:ソニーExperia Z(わりとバッテリー容量の多い(2330mAh)スマートホン)を、走る1kmごとに1%充電していく(スマホンの電源がOFFの状態)
充電開始時速:5.5km/h

充電器の「役割」
パソコンやコンセントでスマホンを充電するときに、スマホンに流れてくる電力は直流(DC)で電圧は5Vとなっています。これはUSB標準の電圧です。しかし、自転車のハブダイナモが出力する電力は交流(AC)で6Vです。 そのままスマホンの充電に使えないわけです。よって、ダイナモハブの6V(AC)を、パソコンなどのUSBから出力される電力と同様の電力(5V(DC))に変換させる必要があります。この充電器がその役目を果たします。

注意:私はほんの少ししか、電子工作に関する知識はありません。本充電器を今まで1,000kmほどの自転車ツーリングで使い続けていて問題は全くなかったのですが、見逃しているところがあるかもしれません。そのため、この充電器を使うことによってあなたが大事にしている電子機器が壊されてしまう可能性がゼロとは言い切れません。本充電器のご使用は自己責任でお願いします。自己で責任を負うのは嫌だという方はこれらの市販自転車用USB充電器のご購入をお勧めします:Bright Light Revolution(非常に格安だと思います)、Busch+Muller Luxos IQ2ToutTerrain Plug II

用意するな部品(札幌市内は、ストリップボード以外にはすべて梅澤無線電機から入手可能)

  • プリント基板(ストリップボード
  • 5V 電圧レギュレーター(LM2940CT-5.0
    • ハブダイナモの6V出力を5Vに変換するための物
  • コンデンサ①(16V, 22uF, タンタル
  • コンデンサ②(35V, 0.47uF, タンタル
  • コンデンサ③(25V, 2200uF, 電解コンデンサ
    • コンデンサの役割とは、自転車の速度による電流の荒れを安定させることだ。
  • ブリッジ整流器(1.5A, 100V)
    • ブリッジ整流器は、ハブダイナモ出力の交流(AC)を直流(DC)に変換してくれる。
  • マイクロUSB端子(USB→マイクロUSBケーブルを切ったモノなど)
  • 出来上がった基板の収納のための適切な入れ物(私はこの缶の中身を別の入れ物に移して缶をケースとして使った)
    • 上記のテトラPHテストの缶を使う場合は耐候性をアップさせるために熱収縮チューブ(19mm10mm)を使うときれいに仕上がる。
    • ケーブルのひねりによるケーブルのダメージを避けるためにこのようなものを使った。

自作の自転車用のダイナモ充電器(USB)

ステップ1

ストリップボードを4穴ⅹ25穴で長細く切ります。切り方は、カッターで両面に切り目を引いて、割ります。

ステップ2

用意した4x25の基板に部品を並べていきます。コンデンサの足は、長いほうが陽(+)、短いほうが陰(-)。写真をクリックすると拡大されます。

自作の自転車用のダイナモ充電器(USB) 自作の自転車用のダイナモ充電器(USB)

自作の自転車用のダイナモ充電器(USB) 自作の自転車用のダイナモ充電器(USB)

ステップ3

ブリッジ整流器を設置する。このステップにおいても、分極(+と―の位置)を注して設置しましょう。

自作の自転車用のダイナモ充電器(USB)

そうすると今の段階では上から見ると以下のように見えているはずです。

DIY Dynamo USB Charger for a Bicycle | 自作の自転車用のダイナモ充電器(USB)

このようになっているのであれば、次に部品を半田付けして固定して行きます。部品の過熱に注意するとともに、並列になっているメッキを横断的に半田が流れないように注意します。

そうすると以下のように見えるはずです。メッキが削られている箇所がいくつかありますが、下の方の箇所のみメッキを削ります(入力電気が直接レギュレーターに流れないように防ぐために削ります)。写真に写っている他の箇所は無視してもOKです。5mmのドリルで手回しで削ることができます)。

自作の自転車用のダイナモ充電器(USB)

ステップ4

マイクロUSB端子を準備します。USB→マイクロUSBケーブルを切ります。USBの大きい方は不要です。USBケーブルの内側はたいていの場合は黒(-)、赤(+)、白(データ)となっています。今回はデータは要らないので、短く切っちゃいます。時には陰の方はグリーン色になっている場合があります。

自作の自転車用のダイナモ充電器(USB)

ステップ5

マイクロUSBケーブルを基板に固定する前に、適切な容器を探しましょう。ホームセンターに行ってウロウロして探すのもアリですが、今回の基板をきれいに収納するのはホームセンター(ビバホーム)で見つけた「テトラ テスト試験紙 pH」の缶です。同じような寸法のアルミパイプでも有りでしょう。テトラの缶を使う場合、エンドキャップに穴をあけてケーブルひねり防止のグロメッとを入れるとわりときれいに出来上がります。

DIY Dynamo USB Charger for a Bicycle | 自作の自転車用のダイナモ充電器(USB)

ステップ6

ハブダイナモに接続するケーブルとスマホンに接続するマイクロUSBケーブルを容器の穴に入れ、基板に固定します。まずはマイクロUSBケーブルの方です。ここでの分極が大事です!赤線が+の列に、黒が―の列に固定します。

DIY Dynamo USB Charger for a Bicycle | 自作の自転車用のダイナモ充電器(USB) DIY Dynamo USB Charger for a Bicycle | 自作の自転車用のダイナモ充電器(USB)

次に、ダイナモハブに接続するケーブルを付けます。ここでの分極は関係ないです。ブリッジ整流器ちゃんがちゃんと整理してくれます。

DIY Dynamo USB Charger for a Bicycle | 自作の自転車用のダイナモ充電器(USB)

ステップ7

ステップ5で見つけた容器に基板を設置します。耐候性を向上させるためのシーラントを付ける前に、この段階に一度自転車に接続しスマホンも接続してちゃんと動きているかどうかを確かめるといいでしょう。

自作の自転車用のダイナモ充電器(USB)

ステップ8

このステップが必ず必要でもありませんが、耐候性を万全にするために、熱収縮チューブを巻きます。

DIY Dynamo USB Charger for a Bicycle | 自作の自転車用のダイナモ充電器(USB) DIY Dynamo USB Charger for a Bicycle | 自作の自転車用のダイナモ充電器(USB)

ステップ9

自転車への取り付けが簡単にするために、ハブダイナモへのケーブルにコネクターを付けました。私が実際にこの充電器を使うのは年に2回程度ですので、使っていない時は取り外したいです。そのため、簡単なコネクターを付けました。

DIY Dynamo USB Charger for a Bicycle | 自作の自転車用のダイナモ充電器(USB)

DIY USB dynamo charger for a bicycle - B+M Lumotec auxiliary power outlet (near Nanporo, Hokkaido, Japan) DIY USB dynamo charger for a bicycle - handlebar mounted plugs (near Nanporo, Hokkaido, Japan)

以上で、29gという軽さの自転車用のUSB充電器ができました。

DIY Dynamo USB Charger for a Bicycle | 自作の自転車用のダイナモ充電器(USB)

実際に使ってみて・・・

今回の自作USB充電器は実は2台目です(回路や部品は全く同じ)。第一回目には、容器としてPVCパイプを使っていました。大変大きくてダサいです。しかし、効率性などでいうと今回のバージョンと一緒です。ソニーのExperiaZスマホンを、走行1kmごとに1%充電できます(電源OFFの状態)。ExperiaZのバッテリー容量が大きい(2230mAh)なので、バッテリーが比較的に小さいiPhoneのようなスマホンなら1kmごとに2%程度の充電ができるかもしれません。

いずれにしても、一日の自転車ツーリングでスマホンのバッテリーをいっぱいまで充電してくれます。注意しなくてはならないのは、スマホンの画面の電力の消費が大変多いですので、画面がオンでかつGPSを使うGoogle Mapsなどのアプリを実行のままで走行すると、充電器を指してもバッテリーは減ってしまいます(充電器を指していないよりも消費が少なくなるのですが)。

DIY USB dynamo charger for a bicycle (Hokkaido, Japan)

DIY USB dynamo charger for a bicycle - charging a Sony Xperia Z (near Nanporo, Hokkaido, Japan) DIY USB dynamo charger for a bicycle, charging a Sony Xperia Z (near Ebetsu, Japan)

DIY Bicycle Dynamo USB Charger for Smartphones and Battery Packs

In this post I describe how I made a USB smartphone charger for a hub-dynamo-equipped bicycle. The idea came from multiple sources, including Mr. Howdy,  Arenddeboer.com, and Peter. But they assume the person making the charger knows how to read a circuit diagram. I cannot understand a circuit diagram. If you’re like me, then this blog post is for you.

DIY Dynamo USB Charger for a Bicycle | 自作の自転車用のダイナモ充電器(USB)

The rundown:

Total cost: approx. US$15 (parts only; you need tools such as soldering iron etc.)
Weight: 29 grams
Weatherproof: Yes
Output: 5 volts DC (USB standard)
Input: 6 volts AC
Efficiency: Will charge a Sony Experia Z smartphone at a rate of approximately 1% per 1km (with the smartphone turned off).
Charge start:  5.5km/h

What this device does
When charging your smartphone using a wall charger or your laptop’s USB, the electricity going into your phone is direct current (DC) at 5 volts. A bicycle dynamo hub, however, usually creates electricity in the form of alternating current (AC), at 6 volts. So, we’ve got to change the electricity created by the dynamo hub (6V AC) into the same type as what comes out of your smartphone wall charger or your laptop’s USB (5V DC). That’s what this device does.

Disclaimer: I know nothing about electronics. This charger has worked well for me so far (about 1,000km of cycle touring), but it may turn on you and eat your smartphone’s innards alive, rendering it a useless shell. If you’d rather let someone else take the responsibility for your delicate electronics, check out the Bright-Bike Revolution (amazing value for a solid charger) or the Busch & Mueller Luxos IQ2 headlight with USB charging built in, or the Tout-Terrain Plug II.

What you need:

  • Parallel stripboard (example)
  • 5 Volt Regulator LDO LM2940 (example) (changes 6V to 5V)
  • Capacitor 1 (Tantalum bead, 16V 22µF) (example)
  • Capacitor 2 (Tantalum bead, 35V 0.47µF) (example)
  • Capacitor 3 (Electrolytic capacitor, 25V 2200µF) (example)
    • The capacitors help keep the flow of electricity steady as you slow down and speed up on your bike (see Wikipedia for more).
  • Bridge Rectifier, 1.5A, 100V (example) (changes the input from AC to DC)
  • Micro-USB terminal (example; you’ll cut off the big USB end and keep the small end, to plug into your device)
  • Wire and terminals to attach to dynamo outlets
  • A case of some kind to hold the electonics
DIY Dynamo USB Charger for a Bicycle | 自作の自転車用のダイナモ充電器(USB)

Step 1

Cut the veroboard (stripboard) into an oblong, 4 holes wide by approximately 25 holes long. I did this by scoring the board with a craft knife on both sides and then snapping it.

Step 2

Start to populate your board. On the capacitors, the long leg is positive. Click on the photos for a larger version.

DIY Dynamo USB Charger for a Bicycle | 自作の自転車用のダイナモ充電器(USB) DIY Dynamo USB Charger for a Bicycle | 自作の自転車用のダイナモ充電器(USB)

DIY Dynamo USB Charger for a Bicycle | 自作の自転車用のダイナモ充電器(USB) DIY Dynamo USB Charger for a Bicycle | 自作の自転車用のダイナモ充電器(USB)

 Step 3

This step can be tricky…aligning the bridge rectifier in place. Note the polarity (positioning of the negative and positive legs).

DIY Dynamo USB Charger for a Bicycle | 自作の自転車用のダイナモ充電器(USB)

Looking from the top, your board should now look something like this.

DIY Dynamo USB Charger for a Bicycle | 自作の自転車用のダイナモ充電器(USB)

You can now go about carefully soldering the parts in place at the rear of the board. Take care not to overheat the parts, and make sure not to ‘connect’ any of the copper strips on the stripboard with stray bits of solder.

Post-soldering should look something like below. Ignore all the drill-marks, except for the one at the bottom. You need that one to stop current going directly to the regulator (LM2940). Holes can be made by hand-turning a 5mm drill bit.

DIY Dynamo USB Charger for a Bicycle | 自作の自転車用のダイナモ充電器(USB)

Step 4

Prepare your micro-USB connector by butchering a cheap USB to micro-USB cable, discarding the big USB end. We will attach this to the circuit-board, and it will plug into your smartphone. Frustratingly, USB cable inner wire colors are sometimes different (like, green for negative). But most of the time, they will be red (positive), black (negative) and white (data). You won’t be needing the white wire, so you can cut it short.

Micro USB inner wire colors (positive, negative, data)

Step 5

Before attaching the micro-USB cable to the circuit-board, a suitable case needs to be found. I happened to have an old fish-tank PH level tester container hanging around that was a perfect size.

DIY Dynamo USB Charger for a Bicycle | 自作の自転車用のダイナモ充電器(USB)

Step 6

Container sorted, time to thread the cables through the openings and solder them to the circuit board. I first attached the micro-USB cable. Red on the positive line, black on the negative line.

DIY Dynamo USB Charger for a Bicycle | 自作の自転車用のダイナモ充電器(USB) DIY Dynamo USB Charger for a Bicycle | 自作の自転車用のダイナモ充電器(USB)

Next, attach the wires that will run from the dynamo hub. The polarity (negative and positive direction) here doesn’t matter at all; the bridge rectifier has magic fairies inside that sort all that out.

DIY Dynamo USB Charger for a Bicycle | 自作の自転車用のダイナモ充電器(USB)

Step 7

Install the circuit board in a suitable container. Before sealing the container up properly, now may be a good time to hook the unit up to a dynamo hub and smartphone to check that everything is working.

DIY Dynamo USB Charger for a Bicycle | 自作の自転車用のダイナモ充電器(USB)

Step 8

This step is not essential, but I wanted to make this unit as weather-proof as possible. Using a couple of different size heat-shrink tubing, I covered the whole thing up, making it very weather-proof.

DIY Dynamo USB Charger for a Bicycle | 自作の自転車用のダイナモ充電器(USB) DIY Dynamo USB Charger for a Bicycle | 自作の自転車用のダイナモ充電器(USB)

Step 9

I wanted to be able to easily attach and remove the charger from my bike. The only time I use it is when I am cycle touring (about twice a year). This was easily done by using simple male/female connectors. The wire running from my hub to the female connectors is on my bike all the time, and I can just connect the charger when I need to.

DIY Dynamo USB Charger for a Bicycle | 自作の自転車用のダイナモ充電器(USB)

DIY USB dynamo charger for a bicycle - B+M Lumotec auxiliary power outlet (near Nanporo, Hokkaido, Japan) DIY USB dynamo charger for a bicycle - handlebar mounted plugs (near Nanporo, Hokkaido, Japan)

So there you have it. A weather-sealed USB charger, powered by a bicycle dynamo hub. It weighs in at 29 grams. Just lovely.

DIY Dynamo USB Charger for a Bicycle | 自作の自転車用のダイナモ充電器(USB)

Performance in the real world

This is the second charger I have made (using the exact same circuitry). The first one ended up in a PVC pipe casing, which is ugly and bulky. It works exactly the same as this new slick-cased version. Using the PVC-pipe-case version, I was able to get around 1% charge for every 1km pedaled on a laden, flat-terrain four-day cycle tour (with the phone powered off). That was charging a Sony Experia Z smartphone, which has a very large battery (2330mAh). With an iPhone, with its smaller 1440mAh, this might be more like 2% charge per 1km.

In any case, with the phone powered off, it will charge fully over a full day of cycling. It does not put out enough charge to keep up with intensive computing tasks like Google Map Navigation. That is, with the screen on all the time, plus the GPS running, the battery will still run down even while charging.

DIY USB dynamo charger for a bicycle (Hokkaido, Japan)

DIY USB dynamo charger for a bicycle, charging a Sony Xperia Z (near Ebetsu, Japan) DIY USB dynamo charger for a bicycle - charging a Sony Xperia Z (near Nanporo, Hokkaido, Japan)

My wife has claimed this new version as her own, so I am still stuck with the PVC pipe version. On her bike, this is the set up we have at present (she doesn’t use a handlear bag). Here, the charger is attached using a cable tie, in the photo at the top of this post, we have attached a velcro strap, which will make attaching/removing the charger easier.

DIY Dynamo USB Charger for a Bicycle | 自作の自転車用のダイナモ充電器(USB) DIY Dynamo USB Charger for a Bicycle | 自作の自転車用のダイナモ充電器(USB)

Shimano Alfine 8 Speed Internal Gear Hub Oil Bath

Shimano Alfine 8 Speed Internal Gear Hub (IGH) draining after oil bath (auto transmission fluid - ATF)

Just over a year ago, I acquired a bicycle – a Surly Karate Monkey (http://14degrees.org/en/?p=1547). Stock standard, the bike is a single-speed. In other words, it has only one gear. This is not conducive to the most efficient cycle touring in the world, so I splashed out and changed to a Shimano Alfine 8-speed internal gear hub (IGH).

Shimano Alfine 8 Speed Internal Gear Hub (IGH)

As you can see, there one cog on the outside, and all the gears, in the form of, literally, gears, are on the inside of the hub shell. The beauty of this setup is that a bicycle with an IGH essentially becomes maintenance free (when one compares with a typical derailleur setup, where you have to clean multiple oily cogs quite often).

IGH’s do need maintenance every now and then, though. I’ve heard of some going for three years before being opened up, and the insides looking like new, but after one year, mine was starting to act up a little; a little more friction than usual, and it was sometimes taking a full half-rotation of the pedals in order for the drive to engage after free-wheeling. I live in Sapporo, Japan, and even though this is the land of Shimano, IGH-equipped bikes are extremely rare here, so there was little to no chance of having the hub serviced locally. Therefore, I decided it was time to pull the thing to bits and have a gander.

The most useful resource for learning about how to pull a Shimano Alfine 8-speed hub to bits was this video below.

Other resources included Nick Foster’s very recent post, of course Muddymole’s post, Ian’s page about the Nexus hub and adding an oil port (similar to the Alfine, but with less sealing), Lachlan Hurst’s post, wisdom from Ecovelo, bike mechanic Sam Larson, Thad at the Golden Wrench and his experiences, Aaron’s Bicycle Repair’s great resource, Sheldon Brown’s advice on lubrication for IGH’s, and last but not least, Hubstripping.com’s page on the Alfine 8-speed hub.

In any case, armed with the right knowledge, and some new tools (I needed a 15mm cone spanner and a centerlock sprocket sans-pin) I got to work.

First off is the Shimano Centerlock disk brake rotor. For this, you need a centerlock/cassette tool without the quick-release pin (so it will go over the solid axle of the Alfine hub). The item number on my Shimano tool was TL-FW30.

Shimano Centerlock removal tool (TL-FW30) for a Shimano Alfine 8 Speed Internal Gear Hub (IGH)

Once that was off, I was able to access the locknut and cone. Using a 15mm cone spanner and adjustable spanner, I removed the cone.

Removing non-drive side bearing cone of Shimano Alfine 8 Speed Internal Gear Hub (IGH)

With these removed, the wheel is flipped over and the drive side bits and bobs removed. This includes the shifting accessories which allow access to a small snap-on plastic cover, which is concealing the snap-ring that holds the cog on. This plastic cover can be pried off by hand very easily.

Removing cover over snapring for cog removal on a Shimano Alfine 8 Speed Internal Gear Hub (IGH)

Next is the snap-ring. A small flat-head screw driver does this job well. Keep your free hand over the snap-ring – when it finally comes loose, it will spring off forcefully.

Cog snap-ring removal on a Shimano Alfine 8 Speed Internal Gear Hub (IGH)

Once you have the snap-ring and cog off, a metal dustguard and plastic ring needs to be removed. The plastic ring provides access to the knobby ‘grip’ of the main screw-on dust-cap, which holds the guts of the hub in.

Dust cover removal on a Shimano Alfine 8 Speed Internal Gear Hub (IGH)

Some people have reported being able to screw open the dustcap by hand (it screws open clockwise, which is opposite to normal), but I had to take to it with a screwdriver to loosen it a little. Once the dustcap comes free, the whole hub shell will fall away from the insides.

Shimano Alfine 8 Speed Internal Gear Hub (IGH) insides after 1 year commuting (shows minor water damage)

On my hub, I noticed right away that water had entered the hub at some stage. I do vaguely remember the non-drive side cone being loose at one stage, and suspect that this was the culprit. If the cone is on properly, then the rubber seal should prevent any water from getting in. The rusty residue was not too bad though, and wiped off easily. After cleaning the hub shell, however, there were some visible blemishes on the bearing race, but no noticeable pitting.

To remove the drive-side bearing cage, the hub needs to be split into two pieces. This is achieved by removing the snap-ring at the non-drive side of the unit.

Shimano Alfine 8 Speed Internal Gear Hub (IGH) insides after 1 year commuting (shows minor water damage)

The whole axle unit slides out of the main ring gear unit in two bits (explosion drawing here). There was no visible rust residue inside, so that was reassuring. I cleaned up the drive-side bearing cage, re-greased it, and put the two pieces back together. This is done by lining up the tab on the ring gear unit, and the groove in the axle unit. Even when the tab and groove are lined up, however, the gears need to be rotated around a little to get the ring gear unit to mate to the axle unit (this can take a while to get right).

Everything back together, with snap-ring re-installed, the whole lot gets dunked in auto transmission fluid. Mine was just normal, service station (gas station) ATF, using a 2 litre PET bottle as a dunking container.

Shimano Alfine 8 Speed Internal Gear Hub (IGH) soaking in oil bath (auto transmission fluid - ATF)

I left it in for about 5 minutes, and then let it drain for about 10 minutes while I was re-greasing the insides of the hub casing.

Shimano Alfine 8 Speed Internal Gear Hub (IGH) draining after oil bath (auto transmission fluid - ATF)

The innards then went back into the hub shell, the various dust covers put back on, the cog and snap-ring (which can be infuriating to get on) and the gear-shifting accessories. And then I took it all to bits again. No joke. I had put the drive-side bearing cage on the wrong way around. The picture above shows it in the correct orientation. That was not a happy moment when I had realised I had put it on wrong…

In all, it took me about 45 minutes plus another 20 minutes to rectify the bearing cage issue. Next time it will take around 30 minutes, I would say. That’ll probably be in another 12-18 months time.

Without the oil bath, the hub just has grease inside it. This means there is quite a lot of friction. For example, when back-pedaling the bike  on a workstand, the back wheel will start to rotate backwards. With the oil bath, however, backpedaling does not affect the back wheel. I didn’t notice any difference in gear changing; that is as smooth as ever.

Fenders for a longboard

Idea for longboard fenders (circa. August 2008)

This is an idea that I had while skating across China in 2008 for fenders which would attach to longboard trucks/wheels to stop water and road grime from flicking up onto the board. My concept was that the fenders would be made from plastic, and attach on the inside of the wheel. I did this sketch on the 23rd of August 2008.

To my joy, it looks like someone (Chase Kaczmarek) had a similar idea and has taken it from an idea to a prototype product: http://longboardism.com/2012/07/wheel-shields-avoid-wheel-bites-and-skate-in-the-rain.html. Brilliant. He calls them ‘Wheel Shields‘ and it looks as though the main design intention was a device to shield against wheel-bite (the wheels touching the board when in motion and turning, causing the rider to be thrown from the board), with ‘fender’ functionality as an added bonus. The device is patented.

A huge thanks to Longboardism.com for the scoop on this one! Head over to the Longboardism.com post (http://longboardism.com/2012/07/wheel-shields-avoid-wheel-bites-and-skate-in-the-rain.html) and fill out a quick survey regarding the devices, and let Chase know what you think. I have already, and I told him that it is a brilliant idea.

(The two Wheel Shield images above via Longboardism.com)


Panasonic Lumix GF1 Review

A while back I wrote a screed of thoughts regarding digital camera choices* and mentioned that I ended up buying a second hand Panasonic GF1 micro four thirds camera; a miniature SLR camera that takes nice lightweight interchangeable lenses. Well it has now been a few months since that purchase, and I now have in my camera kit the following:

  • Panasonic Lumix GF1 camera body
  • Panasonic Lumix 20mm f1.7 pancake lens
  • Canon FD 50mm f1.4 S.S.C. lens + micro 4/3 adapter
  • Raynox polarizing filter
  • Cheap and battered 0.42x fisheye conversion lens
  • A selection of step-down/step-up rings for filters
  • A Zoom H1 sound recorder + hotshoe mount
  • Spare battery for the camera
  • Gorillapod Zoom tripod

I was more than happy with the 20mm pancake lens, and this naturally stayed on the camera for 90% of the time. Great for on-the-bike shots.

Cycling side-by-side near Lake Toya, Hokkaido, Japan

The camera was slung over my shoulder for about 90% of the time I was on my bike. I do not yet have a decent camera bag for the camera yet, so it just hung un-protected…not particularly recommended, but I never managed to damage the camera (as far as I know). I did have the polarizing filter on the lens almost 100% of the time, however, and when I didn’t have the filter on, the lens cap was certainly covering the lens. The bonus with not having the camera in any sort of case, however, was that it was therefore always ready for action.

What I really missed, was having a handlebar bag. I have since ordered an Ortlieb Ultimate 5 Plus handlebar bag from wiggle.co.uk, but it was a real pain not being able to put the camera away quickly in short rain showers, and then getting it out again quickly once they had passed.

The controls on the back of the camera are really very easy to use one-handed, which is important when on the bike. I could adjust apeture, iso, and white balance all with one hand (I had the camera set to Apeture Priority most of the time) while on the bike; great for when you want to crank the apeture way up in order to capture a sense of speed.

Downhill to Niseko Town, Hokkaido, Japan

While 20mm (40mm in 35mm equivalent) is on the long side for everyday shots, I haven’t found this a massive issue. I carried the great old Canon 50mm f1.4 FD S.S.C. lens (100mm equivalent) mainly for around-camp shots where I didn’t want to get in the face of my subjects.

Relaxing in Kyogoku Camping Ground, Kyogoku, Hokkaido, Japan

The polarizing filter was useful in a couple of ways. One was the obvious polarization feature. Crisp blue skies and true colours are great products of reduced glare and reflection, which the filter helps to reduce.

Looking towards Sapporo City over the Toyohira River, Hokkaido, Japan

Swimming at the Kyogoku Camping Ground, Kyogoku, Hokkaido, Japan

The other helpful feature is that it is ever so slightly tinted, which means that with the 20mm f1.7 pancake lens on the camera, I can generally take photos at 1.7 apeture even in bright sunlight. This equals a nice depth of field, which would otherwise not be achieved (the camera would either over-expose or automatically drop decrease the apeture). Not as much depth of field as a 3-stop ND filter, but it is a good compromise when you’re touring on a bike and don’t want to be fiddling around with too many filters.

Coastal scenery on the Shakotan Peninsula, Hokkaido, Japan

Cycling around Mt. Yotei, Hokkaido, Japan

The cheap and battered 0.42x fisheye conversion lens fits on the 20mm f1.7 pancake lens, and provides some light comedic relief, albeit not at the best quality in the world. The Panasonic 7-14mm ultra wide angle lens would be nice, but that’s an extra US$800 or so…so that’s not going to happen in any great hurry.

Cycling through tunnels on the Shakotan Peninsula, Hokkaido, Japan

A danger panda near Lake Toya, Hokkaido, Japan Danger Panda in Sapporo, Japan

On the recent 8-day tour I did with a group in Hokkaido, I didn’t end up using the Zoom H1 audio recorder very much at all. I think it got all of about 5 minutes of use. But then, I didn’t take much video either. I think I was concentrating more on getting used to the photo capabilities of the camera on that trip.

The Gorillapod tripod made a few appearances, but with the speed of the 20mm f1.7 lens, it is not overly necessary save for  dark night time shots (the panorama below was stitched in the great free, powerful, and lightweight Autostitch*).

Camping on the beach in front of Blue Holic Kayaks near Otaru, Hokkaido, Japan

Blue Holic Kayaks near Otaru, Hokkaido, Japan

All in all, I am very happy with the Panasonic Lumix GF1. Very versatile, nice and small and lightweight. Great quality photos, and the 20mm pancake lens is magic. I did find myself wanting a zoom lens on occasion, so I imagine that perhaps a 14-140mm lens* could be the eventual next purchase.

Surly Karate Monkey Review – touring and commuting

This is part of a series of posts about cycling gear I have been using lately. First up, the mighty Surly Karate Monkey.

Surly Karate Monkey Review
Earlier this year, I was looking into bicycle options for life here in Sapporo. I was looking for something that would be as versatile as possible, including something that would be comfortable to ride in the middle of winter here. Sapporo gets massive snowfall in winter; a yearly average of almost 600cm (6 metres!) and an average maximum snowfall in one 24 hour period of 100cm. Unless you’re riding a Surly Pugsley or Salsa Mukluk , you’re not going to be cycling over any snow deeper than 15cm or so, but the local cyclists I talked to here in Sapporo all recommended that I consider getting a 29-inch wheeled mountain bike to handle the icy/snowy conditions in winter in Hokkaido.

With that advice in mind, I approached Surly and asked if they would hook me up with a Karate Monkey frame. Due to supply issues here in Japan, I ended up getting a complete Karate Monkey bike at cost (thanks Surly :-)). I opted for the Karate Monkey simply due to the reputation it has as a no-nonsense, versatile, back to basics bike. Steel frame, great build quality. The bike came set up as a single speed (33t at the front + 17t at the back + Truativ Firex 1.1 + 29-inch wheels = 56.5 gear inches). I have a Shimano Alfine 8-speed internal gear hub on order, but for the last 6 months or so I have been riding it as a single speed. The bike is awesome. I love it to bits. Stock standard with no bitsy accessories, it is like a huge BMX. So much fun. I now have it set up as a commuter/tourer (apart from the lack of gears), and it is very well behaved when loaded up.

2011 Surly Karate Monkey | 2011年サーリーカラテモンキー

Freeload Racks on the Surly Karate Monkey getting some use on the Shakotan Peninsula, Hokkaido, Japan Gravel roads near Lake Toya, Hokkaido, Japan

Cycling on gravel roads is really where this bike comes into its own. The stock complete bike comes with WTB 2.2 tyres, which is a helluva lot of balloon power. The 700cc rims (well, 29-inch in mountain biking marketing parlance) mean that the final diameter of the wheel is monstrously large, creating a smaller approach angle on bumps in the road, meaning you get a smoother ride. As you can see, I have installed trekking/touring bars on the bike now, which increase the comfort level up even more.

Freeload Racks review on a Karate Monkey
Finding racks for a 29-inch disk brake bike setup can be a little challenging, however I have found that with a little tweaking the Freeload Racks do fit, and are an especially elegant solution for front racks on a Karate Monkey. They fit on more or less any bicycle on the planet (I wonder if they have tried a penny farthing), and are a great piece of ingenuity.

A Freeload Rack on the back of a Karate Monkey is a little more fiddly than the front, since there is nowhere on the rear seat stays where you can get a 100% snug fit onto the frame, due to the asymmetrical spacing of the cable lugs on the Karate Monkey frame. I got the racks sitting even by adding rubber shims to both sides of the mounting feet of the Freeload Racks. Not ideal, but it does the job (and my oh my those nylon straps on the racks are strong).

2011 Surly Karate Monkey rear rack (Freeload Racks)

2011 Surly Karate Monkey rear rack (Freeload Racks) 2011 Surly Karate Monkey rear rack (Freeload Racks)

2011 Surly Karate Monkey with front rack (Freeload Sports Rack)

With shorter chainstays on the Karate Monkey, the adjust-ability of the Freeload Racks on the back of the bike is very helpful for heel clearance. You have to have the pannier mounting rails adjusted as far back as possible, but this doesn’t seem to be too much of an issue. Mounting panniers on the lower of the two pannier mounting rails helps stability even more, however, by lowers the center of gravity overall; this is a great feature of these racks, and especially welcome on a 29-er mountain bike which has a higher center of gravity to start with.

A Freeload Rack on the front of the Karate Monkey is absolutely rock-solid, and is an excellent solution to the no-rack-eyelets issue on Karate Monkey forks. I am thinking of  getting a touring platform (one with pannier rails) for the front, as I can imagine that this would be an awesome option for carrying panniers on the front of the bike. On a recent 8 day tour, the “Sports platform” was handy for carrying bulky items such as synthetic sleeping bags or wet tent flies.

Freeload Racks (front rack) on the Surly Karate Monkey getting some use on the Shakotan Peninsula, Hokkaido, Japan A loaded Surly Karate Monkey - cycle touring near Niseko, Hokkaido, Japan

As for loaded touring on a single-speed (not entirely recommended), this is what I had to say previously:

I would say that the single speed gearing of the Karate Monkey (33t at the front + 17t at the back + Truativ Firex 1.1 + 29-inch wheels = 56.5 gear inches) is near perfect for all-round cycling. Even with a load on the bike. So far on the tour, I have not come across any situation when I had to stop and push the bike, but so far I have not had to cycle up steep gravel/side roads…I think that could be a situation where the single speed proves fatal on a bicycle tour. In other words, while gears would be the obvious preferred choice, this particular single speed setup on the Karate Monkey is great for day-to-day riding and on-road cycle touring. It bears mention that I do use SPD pedals. I think the situation could be different if I was not clipped in and using decent stiff soled cycle shoes. That is to say, on the uphills, I have spent most of my time standing up. Essentially spending up to three hours on a glorified stepping machine (albeit with much more interesting scenery than in a stuffy gym). This is doable though. (link)

The recent 8 day summer tour has got me all excited for a winter tour here in Hokkaido :-)

Disclaimer: Freeload Racks sent me a pair of their racks free of charge to test and provide feedback.

HOKKAIDO (Mini-tour Day 7): Lake Toya Central Campground to Kyogoku Campground

31km on the bike before 10am. Now that’s my kind of morning. But there’s really no excuse not to when the sun rises at 4am!

Surly Karate Monkey in a campground next to Lake Toya, Hokkaido, Japan Early morning at Lake Toya, Hokkaido, Japan

Lake Toya Camping Ground, Hokkaido, Japan

There was more rain in the night, but it had all passed by dawn. We are all using tents owned by Haidee and I, and thankfully they all seem water-tight. Rowland and Alicia are using my ancient Kathmandu North Star Plus tent which I bought during a half-price sale in New Zealand in 2002. I used that 3kg behemoth of a tent on my cycle tour across the Eurasian Continent in 2006, so the tent is understandably showing signs of wear and tear.

The seam sealing on the floor was peeling (replaced with some seam-sealer goop from Montbell), as is the seam sealing on the fly. The tent floor fabric itself has also lost most of its waterproof sealing. Roland and I tried to replace this also, using a special paint-on tent floor sealing product, but this generally just ended up a sticky mess. We ended up having to coat the floor with talcum powder on the morning we all left on the tour because it had not dried in time.

Haidee and I are in the great MSR Hubba Hubba tent we bought earlier this year. It is about 2kg, and is super fast to pitch. Quite unlike any tent I have owned in the past. Very happy with that purchase. Saoka is in my MSR Carbon Reflex 1 tent, kindly supplied by MSR to replace the great little MSR Microzoid tent I used on my longboarding journey across the US and China. I haven’t slept in the tent myself yet, but at around 1kg, and 100g lighter than the Microzoid tent (but with waaaaay more room), it looks to be a near perfect one-person tent.

Bicycles in a campground next to Lake Toya, Hokkaido, Japan Lake Toya Camping Ground, Hokkaido, Japan

Feet in a tent at Lake Toya, Hokkaido, Japan

Today’s scenery was simply spectacular. Mt. Yotei, or “little Fuji” as it is known, cut quite the striking figure against a beautiful blue sky.

Cycling around Mt. Yotei, Hokkaido, Japan

Cycling side-by-side near Lake Toya, Hokkaido, Japan

Once again we arrived at our ultimate destination for the day at around 10am. Kyogoku natural fresh water springs was the place. Quite nice indeed. Clear, ice-cold water gushes forth out the ground here in massive quantities. Locals come to fill 20 litre barrels by the trolley-load, Chinese and Korean tourists waddle around by the bus-load, and weary cycle tourists (that’s us) wander around enjoying the cool natural air-conditioning of the flowing waters.

At the Kyogoku Springs, Kyogoku, Hokkaido, Japan

At the Kyogoku Springs, Kyogoku, Hokkaido, Japan At the Kyogoku Springs, Kyogoku, Hokkaido, Japan

Eating watermelon at Kyogoku, Hokkaido, Japan

From the spring’s source, it is only a 5 minute walk to the Kyogoku Campground (500yen per tent per night). The water from the spring flows in a narrow stream past the campground, so we all egged each other on to jump in. I was one of the first, and within seconds my legs were cramping from the cold. Rowland followed, and was equally wracked with pain. Saoka wandered into the frigid water as if it was the most natural thing in the world, and proceeded to wander around in the water for at least 5 minutes. 5 seconds in that water and I was in excruciating pain…as was Rowland also.

Swimming at the Kyogoku Camping Ground, Kyogoku, Hokkaido, Japan Swimming at the Kyogoku Camping Ground, Kyogoku, Hokkaido, Japan

Swimming at the Kyogoku Camping Ground, Kyogoku, Hokkaido, Japan

Splashing in the water was followed by pleasant but uneasy lounging in the grass at our campsite. Uneasy in the sense that the site was inundated with ants. Lying in the grass on sleeping mats was an exercise in frustration.

Relaxing in Kyogoku Camping Ground, Kyogoku, Hokkaido, Japan

Relaxing in Kyogoku Camping Ground, Kyogoku, Hokkaido, Japan Feet in Kyogoku, Hokkaido, Japan

For food on this trip, we have been mainly eating lunches at cheap eateries (usually under 800yen each), and cooking our own dinners with items bought from local supermarkets. Dishes on the menu have included pasta, curry rice, and potato salads. Snacks have been mainly bought from convenience stores, which are to be found in almost any resemblance of a human settlement in Japan. Travelling by bike, camping, and organizing food in this way, Rowland and Alicia have found that it is much cheaper to travel by bike in Japan than it is to travel by public transport and staying at hostels/inns in Southeast Asia.

At a Lawson Convenience store in Kyogoku, Hokkaido, Japan

Taking up a parking space on bicycles at the Lawson convenience store in Kyogoku, Hokkaido, Japan

We did splash out a little today for dinner. Instead of cooking it ourselves, we biked 2 minutes to the local onsen complex next to the campground which served an array of cheap, delicious food. Most dishes were under 600yen, and even though the beer was a little on the steep side (450yen for tap beer), it was a nice relaxing way to enjoy the evening. I went for a cold dish; soba noodles with dipping sauce.

Zaru-soba in Kyogoku, Hokkaido, Japan

Another enjoyable day done :-)

Doubling on a bicycle in Kyogoku, Hokkaido, Japan

Route Map

View Larger Map